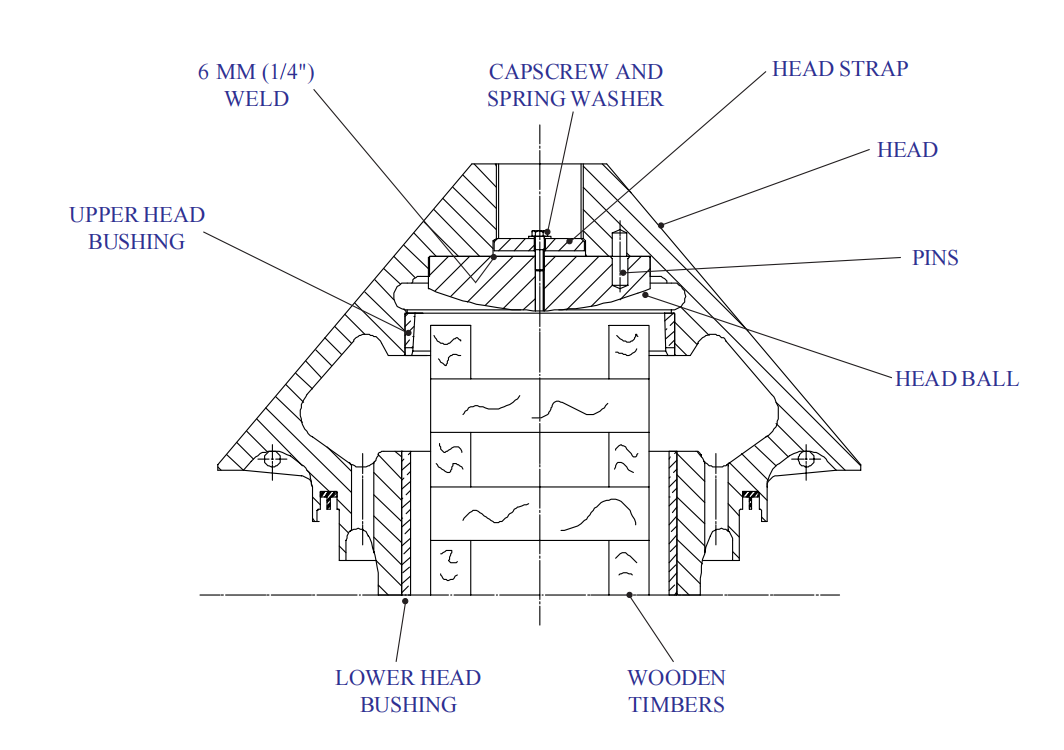
Cone Crusher Head Ball
What is cone crusher head ball?
In a cone crusher, the head ball is the stationary upper part of the crusher mantle that sits on top of the main shaft. The head ball is usually made of hardened steel material and is typically bolted onto the top of the main shaft. It acts as a support for the mantle, which is the movable part of the cone crusher that rotates eccentrically within the head ball.
The mantle and head ball work together to crush the rock or other material being fed into the crusher. As the mantle rotates eccentrically, it creates a crushing action against the stationary head ball, which causes the material to be crushed between the mantle and the concave liner.
The head ball is an important component of a cone crusher, and any damage or wear to this part can affect the performance and efficiency of the crusher. Regular maintenance and inspection of the head ball and other parts of the cone crusher can help ensure its optimal performance and longevity.
How to replace the cone crusher head ball?
The head ball seats on the socket liner and any wear on the ball seating surface normally will be negligible. If due to lubrication failure or contaminated lubricating oil, the head ball bearing surface can become worn to the point where the head ball must be replaced and proceed as follows :
- Remove the cap screw that attaches the head ball to the head. Since this capscrew was installed with Loctite, the capscrew must be heated with a torch to approximately 205° C (400° F) before it can be unscrewed.
- The head ball has a slight interference fit within the counterbore at the underside of the head cavity and will have to be driven free as follows: Place blocking under the head ball in such a manner that the head ball will not fall a great distance and possibly damage the head bushing bore. The blocking, however, should be low enough to permit the head ball to drop clear of the counterbore in the head; Place a 50 mm x 50 mm (2 x 2”) timber block between the welded washer and the borehole in the head and hammer until the spherical stop is freed.
- After the worn head ball has been removed, turn the head upside down and clean the head ball seating surface in the head.
- Pack the replacement head ball in dry ice for 4-6 hours to shrink the head ball to permit the ball to «drop» in the head seating area. Approximately 23 kg (50 Ibs.) of dry ice will be required. Measure the outside diameter of the head ball and the bore of the head to determine when the head ball has cooled sufficiently.
- With the cooled head ball connected to a suitable lifting device hooked through a ring bolt threaded into the center hole, quickly lower the ball into position in the head, being sure it is fully and squarely seated against the bottom of the head counterbore. Use a feeler gauge to check that the head ball is seated against the head, all the way around. Check at least 4 places! Make sure the dowel holes in the head ball are in alignment with the dowel pins in the head.
- Insert the proper size capscrew through the hole in the head strap welded into the head bore and thread it into the tapped hole in the head ball. Then tighten the capscrew.
- AFTER the head ball has warmed up to ambient temperature, remove the previously installed capscrew, and clean the capscrew threads and the tapped hole in the head ball with an oil free solvent. Then apply Loctite 277 to the threaded surfaces, re-install the capscrew with the special spring washer, and tighten the capscrew.
If you have any questions or inquiries about cone crusher parts, contact us freely!

 Download Brochure
 Product List


